Before Starting
There are 2 things you can do to ensure that your plans are easy to work with and error free.
1. Flatten PDFs prior to upload. This article provides a step by step process.
2. Ensure that the largest dimension of the document is under 60". This will ensure faster load times.
1. Adding Location Plans
Choose Where to Place the Plan
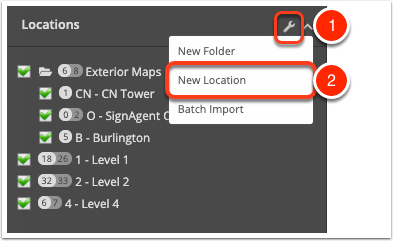
- Select: Wrench in the Locations area of the sidebar
- Choose: New Location
You can also Right-click on any Folder in the Location Structure to add.
For more info on Batch Import, check out this article: Batch Import
Enter Plan Information
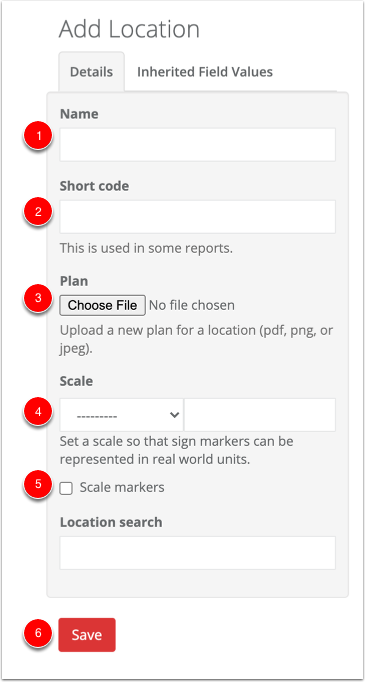
- Name - This is a full name of the floor plan, like "Level 3"
- Short Code - This is a shortened version of the name, like "3" or "L3"
- Choose File - This will open up a dialog where you can choose a PDF plan from your computer.
- Scale - Add a scale for this location plan. This is used for in-app measurements and scaled custom sign markers. You can see more info on this here: Scaled Location Plans.
- Scale Markers - If you check this, this plan will use custom markers from the "Scaled Custom Markers" section for each sign type, if available.
- Save - Don't forget!
Once you've added the new plan, you'll be able to view a comparison between new and old. Check out this article for more info on that: Location Plan Comparisons
Once the plan has been uploaded and rendered, you'll also be able to adjust the opacity. See more on that here: Location Plan Opacity
Want more advanced options? Check out these articles:
Inherited Field Values
Exterior Locations (Maps)
Location Zones
To update or replace a floor plan see this article: Replacing Location Plans