Brought to you by Marky Mark and the Marker Bunch
Triangles and lines not doing it for you? Now you can add your own custom sign markers to each sign type!
Want the markers to size dynamically based on real widths? You can do that too!
1. Create Custom Marker

A couple things to keep in mind here:
Note that the sign type colour will only be applied to the fill, not the stroke.
- All parts of the marker should be in a main layer called "marker"
- Any parts that you want to be re-coloured based on the sign type's color should be grouped under a layer named "color". In the example, both rectangles will change colors and 1 and 2 will remain black.
- Note that the default position is when a viewer of the sign is looking at it from the "North" in SignAgent, so you should draw it so that the primary face of the sign is facing "upwards" (See Side 1 in my drawing).
1.1 (Optional) Insertion Point
The marker's "insertion point" (aka, where the marker will appear when you right-click to create a sign) will, by default, be in the center point of the exported SVG. So, if you export with an artboard, it will be the center point of the artboard. If you export without an artboard, it will be in the center point of the drawing contents.

If you want a custom insertion point that is not the center point (like in the image above), you can add an additional sub-layer called "insertion" and add a no-fill, no-stroke circle in that sub-layer.
1.2 Export SVG
You can choose to Export with or without Artboards, but keep in mind that the insertion point will be the center of the SVG unless you've added a custom insertion point.
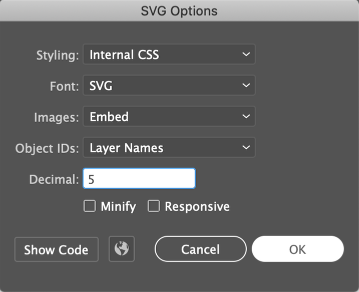
The settings here are the same as for SignAgent templates.
- Styling: Internal CSS
- Font: SVG
- Images: Embed
- Object IDs: Layer Names
- Decimal: 5
- Minify: No
- Responsive: No
2. Upload Custom Marker
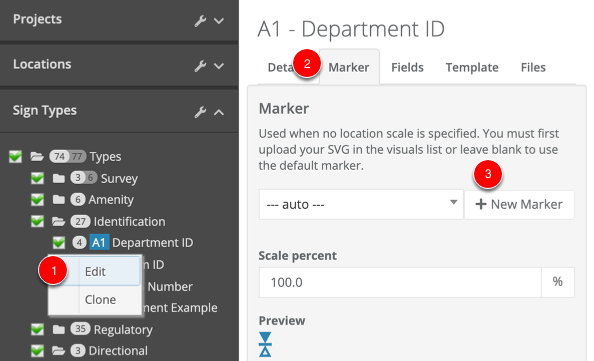
- Choose the Sign Type you'd like to add a custom marker too. Right-click on that sign type in the left-hand sidebar, and choose Edit.
- Go to the Marker tab
- Choose the New Marker option.
Note that you can also add a new marker from the Manage Visuals page, by choosing "Add Visual", and checking the "is Marker" checkbox.
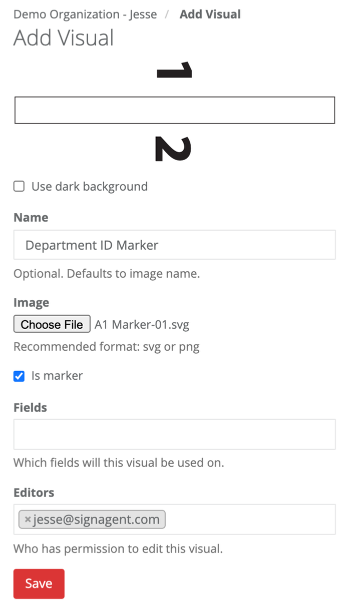
Add a name for the new marker, upload the file, make sure "Is Marker" is checked, and don't forget to pick Save!
When you upload your file, you should see a preview of what the SVG looks like too!
3. Choose your Custom Marker
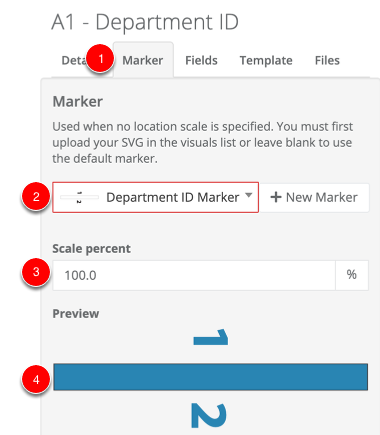
- Go back to the Sign Type Edit page, and to the Marker tab.
- Choose your custom marker from the drop-down list here.
- Here you can adjust how large this marker will be compared to the standard, automatic markers.
- You'll also be able to see a preview of what this sign marker will look like in the sign type's colours.
Don't forget to Save once you've applied it!
3.1 Scaled Markers
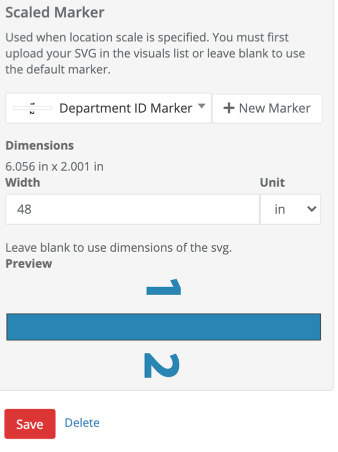
The scaled markers are used when a location plan has an associated scale, and has the option to "Use Scaled Markers" selected. See more information on that here: Scaled Location Plans
The main difference here is that you can set the real-life width of this sign, and the marker will remain the appropriate size on your scaled plan.
Pro Tip: Even though you're setting the sign's width to the actual width of the sign, you may not want to draw the custom marker's thickness to scale... since most signs are very thin, it can make them difficult to see on location plans.