Signs have been around for so long, it's amazing they waited until 2002 to make a movie about them
First, choose the sign (or signs) that you'd like to Edit.
Note that you can select multiple signs in 4 ways.
- By holding the shift key and clicking on the signs you'd like to select, specifically, on the map.
- By holding the shift key and dragging a box around the signs you'd like to select, on the map.
- By clicking on a sign in the list, holding shift, and selecting a sign lower down. This will also select all the signs between those 2.
- (PC Only) By clicking on a sign in the list, holding ctrl, and selecting other signs, specifically.
Once you've selected the sign, you'll see multiple fields that you can adjust as you see fit.
Note that the fields visible here will depend on the type of the sign (or signs) selected.
If you've selected signs of different types, you'll only be able to modify the fields that are common between ALL the signs.
You can find more info on fields in sign types here: Manage Fields
Section 1: Project, State, and Sign ID

This section contains the basic, background information about the sign.
- Project - The project this sign is part of.
- State - The state the sign is currently part of.
- Type - The sign type of this sign. Note that changing this may change the fields available in the Message and Details areas, as well as the artwork.
- Location - The location that this sign is currently on.
- Number - The number assigned to this sign
- Quantity - The quantity associated with this sign.
- Direction - The direction that the sign is facing.
- Sign Menu - Allows you to Clone the sign with or without attachments. See more details here: Cloning Signs
- Review States - Allows you to Approve or Reject this sign, if you've been assigned to the state as a reviewer. See more details here: Reviewing Signs
Section 2: Artwork and Messages


- Artwork - This will change after you save a sign, based on the messages used in the Message Section. Note that artwork will only show up if you've added a template to this sign type.
- Download Artwork - Here you can download this specific piece of artwork as an SVG or PDF, and you can choose whether or not to Outline the Text for each.
- Upload Custom Artwork - See more info here: Uploading Custom Artwork
- Message Section and Message Fields - Here is where you will see the message fields for this particular sign type and where you can edit them. Note that if there are no fields set up for this sign type, you'll instead see a "Add Fields" button.
- Note also that some fields can't be directly edited here. Specifically, Translation Fields, and Fields Inherited from Location are changed elsewhere.
- Link to Message - This will take you to this specific message in the Manage Messages Table
- Message Menu - This has options to add a New Field (taking you to the Manage Fields page) or to Edit Sign Type Fields (taking you to the specific sign type)
Section 3: Detail Fields
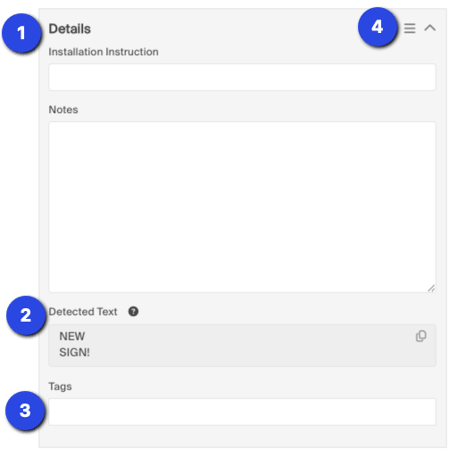
- Details Section and Details Fields - Here is where you will see the details fields for this particular sign type and where you can edit them. Note that if there are no fields set up for this sign type, you'll instead see a "Add Fields" button.
- Note also that some fields can't be directly edited here. Specifically, Translation Fields, and Fields Inherited from Location are changed elsewhere.
- Detected Text and OCR - This shows the text that has been detected from any attached photos using Optical Character Recognition. This is automatic and can't be changed. You can copy the text from here by clicking on the copy icon.
- Tags - This field allows you to add custom tags to each of your signs that can then be searched for via the Advanced Search feature
- Details Menu - This has options to add a New Field (taking you to the Manage Fields page) or to Edit Sign Type Fields (taking you to the specific sign type). You can also toggle visibility of the OCR section, which will affect all signs globally.
When you're happy with the changes you've made, be sure to click the Save button to save your changes.
Once you've made changes and saved them, you'll also see those changes in the Audit Trail at the bottom. To see the difference in the changes you just made, you can click [show diff]
Note that you can select multiple signs in 4 ways.
- By holding the shift key and clicking on the signs you'd like to select, specifically, on the map.
- By holding the shift key and dragging a box around the signs you'd like to select, on the map.
- By clicking on a sign in the list, holding shift, and selecting a sign lower down. This will also select all the signs between those 2.
- (PC Only) By clicking on a sign in the list, holding ctrl, and selecting other signs, specifically.