If you're expecting a tutorial about corn, you should know that's the wrong kind of fields.
1. Go to the Manage Fields Screen
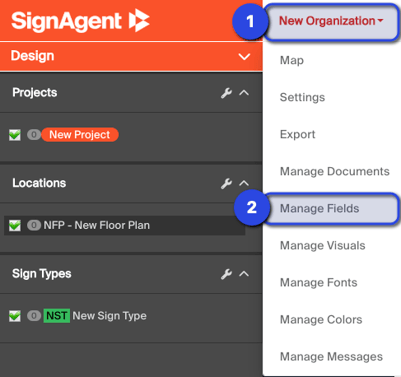
Click on your organization name near the top-left corner of the screen, and choose the Manage Fields option
2. Select the Field to Customize OR Create a New Field

On this page, you can see lots of information about fields. There are three types:
- Global Fields - These fields show up in all sign types, including all existing and newly created types.
- Custom Fields - These fields only show up in sign types where this field is specified. Note that you can also see which sign types are using each custom field.
- Translation Fields - These are automatically created based on your Language/Translation Settings. They can not be directly selected or changed on this page. You can see more info on these here: Set up Translation Fields
To edit any existing global or custom field, just select it by clicking on it.
To create a new field, click the "new field" button near the top of the page.
3. Customize the Field
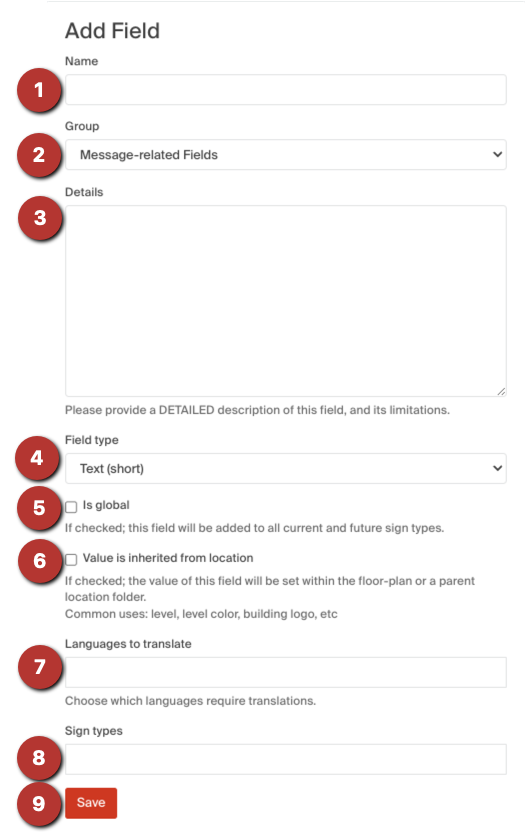
On this page, you have lots of options to customize each field, if you so choose.
- Name - the name of this field. This is the name that will be displayed in the sign dialog and referenced by any templates you create. Keep in mind that changing this name can make your templates cease to function, so be a bit careful doing this.
- Group - Your options here are Message-related fields and Detail fields. Message-related fields contain information that is typically displayed on the sign itself. It can be single or repeating. Detail fields contain information that is not displayed on the sign (and thus can't be referenced by templates)
- Details - You can include additional details about this field if you so choose.
- Field Type - This affects what information can be added to this field. Most of the options are pretty self-explanatory, but keep in mind that you can only add images to "Visual" fields, Colours to "Color" fields, etc. For more information, check out this article: Different Field Types
- Is Global - If checked, this field will be added to all current and future sign types.
- Value is inherited from location - If this is checked, then you'll have the option to have this field defined in the Edit Location page (or Edit Location Folder page)
- Languages to Translate - Choose which languages this field will be translated into. If you choose a language here, it will add a new translated field when you click Save. You can see more info on this here: Set up Translations
- Sign Types - Here, you can see the short codes for which sign types are currently using this field. You can also add more sign types in here directly to add this field to multiple sign types at once. Note that this will place the field at the bottom of the Message Fields list for any new sign types added this way.
- Save - click this once you're done, and all changes will be saved (Don't forget to click this)
Note that you can also create fields just by typing the field name in the "Fields" tab when editing or creating a Sign Type. If you create a field this way, it will default to the type "Text (short)"