Le pamplemousse est dans la bibliothèque?
Go to the "Manage Messages" tab by clicking on your Organization name and choosing "Manage Messages".

Then click on the "Languages" tab to pull up this window:

1. Set up Primary Language
To change the Primary Language, just click on where it says "English" (or whatever your current primary language is). This will take you to your organization settings.
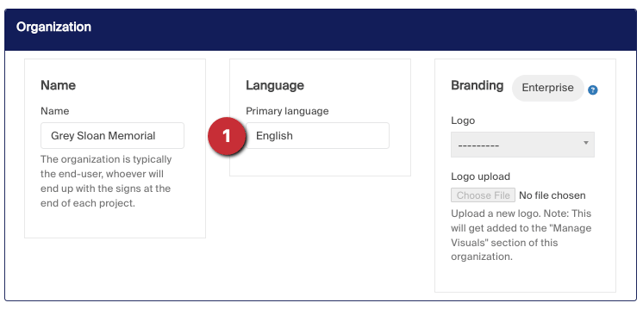
Once you're there, change the field under "Language" to reflect your primary language. Don't forget to scroll to the bottom and hit Save when you're done.
Note that this does not currently change the language of SignAgent's interface. It's more meant to reflect the language of your primary messages.
2. Set up Secondary Language(s)
To add a new secondary language, just click on the "+ new language" button

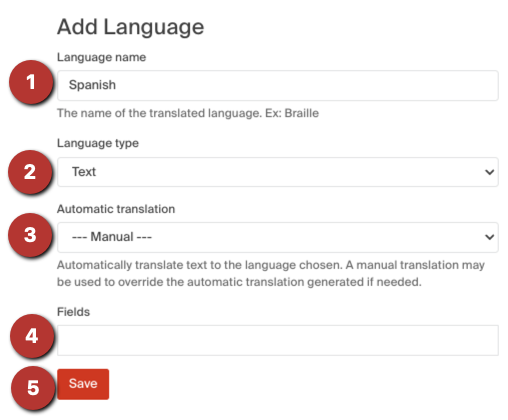
- Language Name: Pretty self-explanatory, whatever the name is of the language (or translation) you're adding
- Language Type: There are a few options here:
- Text: This will be the most common, and is the standard translation for other languages (French, Spanish, Arabic, Mandarin, etc.)
- Visual: This is used if certain messages will always have symbols associated with them. This could be used in directory or directional signs to for destination symbols, like restrooms, cafeterias, parking, etc.
- Colour: Similar to Visual, this is used if certain messages will always have colours associated with them. This could be used to save time on Zone Colours or possibly for Emergency Red, etc.
- Automatic Translation: Note, this is only available for English Braille translations.
- Fields: What fields will need translating to this language? When you add a field name here and then click Save, it will automatically add new Translation Fields for these fields. For example, adding Room Name to this field would automatically create a new Translation Field called "Room Name Spanish"
- Save: Don't forget to Save!
You can also add translations to fields on the Manage Fields page!