Why do graphic designers make bad drummers?
Because they spend too much time adjusting their SYMBOLS!
You can upload your own images to SignAgent™ for use in sign artwork. This tutorial will show you how to upload and categorize these images.
Note that SignAgent refers to all images, symbols, maps, graphics, logos, etc. that are uploaded into the system as VISUALS.
1. Go to the Manage Visuals Screen
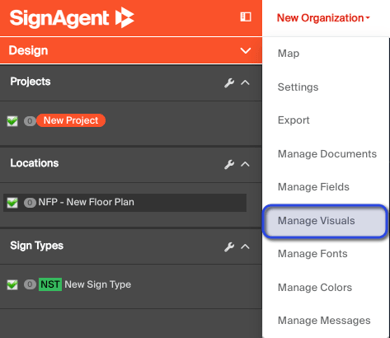
Click the drop-down list with your organization's name (near the top-left corner of the screen), and choose the Manage Visuals option
2. Select the Visual to Customize OR Create a New Visual

- New Visual - Upload a single visual.
- Batch Import - Allows for the uploading of multiple visuals at once and includes all the same information as a single visual.
- Filter - It is possible to assign a visual to only be used in specific fields (see step 3 below). In this example, the arrows-down and arrows-down-left visuals can only be used by the Arrow field. This filter sorts by field to find the visuals that are assigned to it.
- Existing Visuals - These are the images that have already been uploaded. Clicking on them will allows for editing of these visuals
- Sign Markers - Visuals that are not used within artwork but instead to represent signs on the map. See this article on Custom Markers for more information.
Note: SignAgent has several built in sign markers that you can find under the "marker" tab when creating new sign types as outlined in this article. We've just made it possible for you to create custom ones as well.
3. Create/Customize Visual

On this page, you have a few options to customize this visual.
- Preview - This is a preview of what this visual will look like.
- Use Dark Background - This allows you to toggle the background colour displayed in visuals using transparencies. Can be useful for white or light visuals with transparent backgrounds.
- Name - This is the name that will be displayed in the visual drop-down list, so be sure to give it something clear. If you leave this blank, it will default to the image name.
- Image - Here, you can upload the visual file that you'd like to be displayed. Note that SVGs are vectorized, whereas PNGs are not.
- Use As Marker - Check this if this is for a custom marker.
- Fields - Specify the fields this visual should be used by. Connecting a visual to a specific field/s also excludes unassigned visuals from that field. For example, an arrow visual might assigned to the "Arrow". Once that happens, all other visuals, like the check-in desk icon will not appear as an option to be selected in the Arrow field.
- Save - Click this once you're done, and all changes will be saved. (Don't forget!)
Delete - If you're editing a visual, you'll have the option to delete it as well, if it's not being used by any existing signs.