Using Microsoft Azure? This tutorial is going to be sso important to read.
This article will show you how to enable SSO in SignAgent for your company, using Microsoft Azure.
Note that in order to do this, you'll need to have one of the following permission levels:
- Global Administrator
- Application Administrator
- Cloud Application Administrator
Note that SSO is an Enterprise-Level feature, so is not available on all user accounts.
Part 1: Add SignAgent as an Enterprise Application to your Azure Portal
1A: Create Your Acount
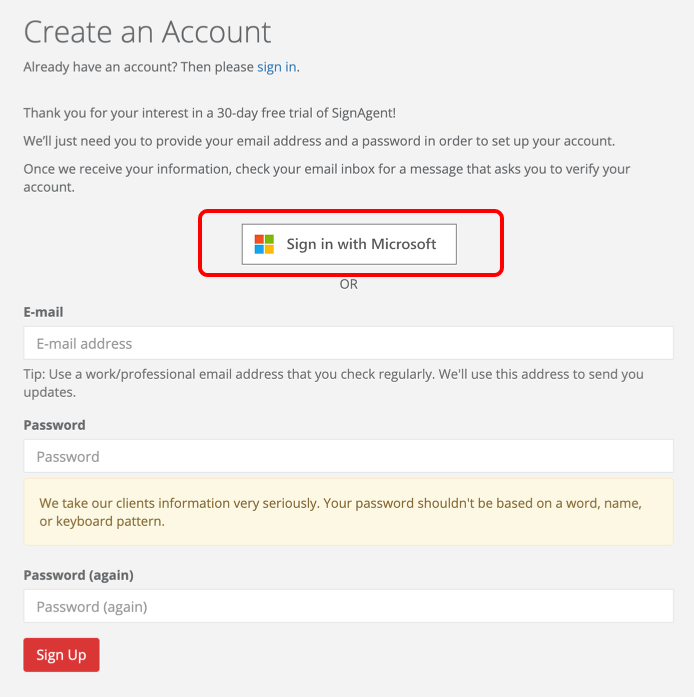
First, go to https://app.signagent.com/accounts/signup/ (or go to app.signagent.com and choose Register
At the following page, choose Sign In with Microsoft, and log-in using your typical email address and password. You'll also have the option to "Stay Signed In" or not, which will simply reduce the number of times you'll need to enter your password.
1B: Grant Permissions to Your Organization (Company)
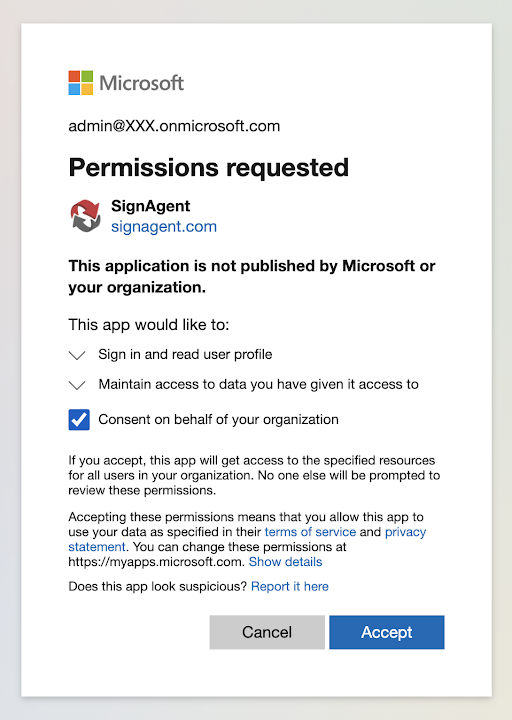
Next, you'll get the above dialog (or similar).
Check "Consent on behalf of your organization" and then Accept
This will allow non-administrators (with appropriate permissions) from your company to use SSO to log in to SignAgent
1C: Confirm SignAgent Application is Added in Microsoft Azure Portal

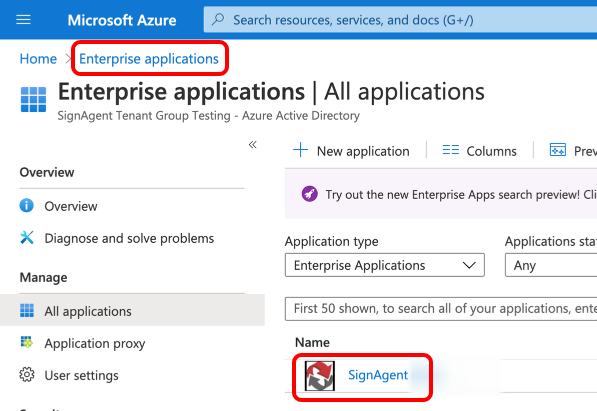
Finally, go to your Microsoft Azure Portal (portal.azure.com), and select Enterprise Applications.
If you completed the above steps correctly, you should see the SignAgent application added in this section.
2. Assign SignAgent Application to Specific Tenants (Optional)
If you don't want all users in your company to have access to SignAgent, you can assign this application to only specific Users or Groups. Otherwise, you can skip to Step 3.
2A: Activate User Assignment
First, go to portal.azure.com. Go to Enterprise Applications, and click on SignAgent.

Next, select Properties, and set "User Assignment Required" to "Yes"
Don't forget to Save!
If this setting is set to Yes, you’ll need to manually assign users to the SignAgent application
If this setting is set to No, all users will have access to the SignAgent application by default.
See Step 2B for Details
2B: Assign Specific Users to SignAgent

To give access to specific users for the SignAgent application, select Users and Groups in the left-hand sidebar, and then use the "Add User" button to add the appropriate users who need access to the SignAgent application.
3A. Turning on SSO (General Users)
You can provide the following instructions to users through this support article: Setting up Your Account for SSO
Before they are able to use SSO each general user must activate it in their account with these basic steps:
- First, navigate to your personal account settings from the drop down menu available on the top right of the page:

- Scroll down and select Single Sign-On:

- Finally, select Add a Single Sign-On Account:

3B. Signing In to SignAgent (General Users)
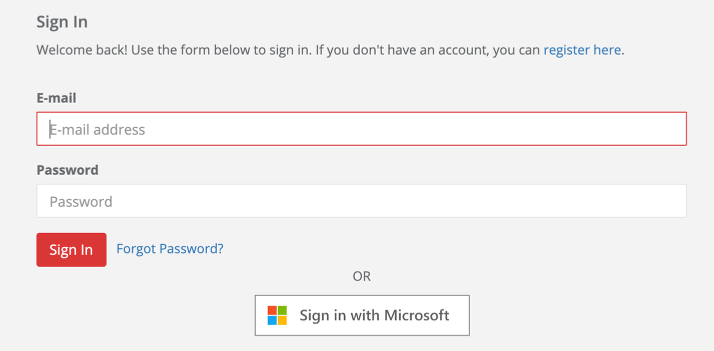
Now, for general users to sign in, all they have to do is choose "Sign in with Microsoft" and enter their credentials. Depending on your company settings, they may be prompted to validate using 2-Factor Authentication via Microsoft Authenticator or another method.