I can see paradise by the (SignAgent) Dashboard light!

Whoa, check out that slick dashboard! We've made some changes to make this area more functional and informational, and this article will give you an overview of what you can do on the SignAgent Dashboard.
1. Add Organization
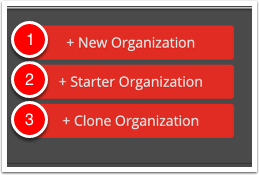
You have 3 options here to add a new organization:
- New Organization - Creates a new organization with a single project, state, location, and sign type. You'll have to do all the set up.
- Starter Organization - Creates a new organization from the starter organization, including some sample projects, states, locations, sign types, signs, visuals, fields, templates, and more. Great for training or playing around in the system.
- Clone Organization - Copies an existing organization (that you have admin access to), with the option to copy over projects, states, locations, sign types, and/or signs, based on what you need for this new organization.
For more information, check out the articles here: Working with Organizations
2. Filters

These options at the top of the dashboard will allow you to customize your view and find exactly what you're looking for. They're also persistent, which means that these preferences will be saved and show up next time you open up the dashboard!
- Show X Projects - Choose how many projects you'd like to see at once. Options are 10, 25, 50, 100, 200, or All
- Filter - Choose what type of projects you'd like to see
- "---" - No filter, shows all projects
- Favorite - Any projects marked with a Yellow Star
- Active - Any projects with at least one "Active" state. An Active state is one that is between its Start Date and End Date (highlighted Green), and is not marked as Complete
- Overdue - Any projects with at least one "Overdue" state. An Overdue state is one that is past its End Date (highlighted Red), and not marked as Complete
- Active/Overdue - Any projects with at least one state that is marked as either Active or Overdue
- Archive - Any projects that have been archived. Note that these archived projects will not otherwise be visible on the dashboard.
- Users - See projects that contain the specified user. Note that you will only see users that you share at least one organization, project, or state with.
- Search - Search the names of organizations, projects, or states for this text.
3. Organization Column
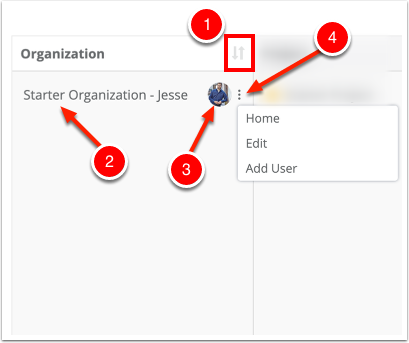
- Sort - You can sort ascending or descending by Organization Name. Note that "Favorite" projects will still show up at the top of the Ascending List
- Organization Name - Click here to go to the first location plan in this organization
- Users - Hover here to see which users are in this organization. Click here to adjust permissions for this organization.
- Organization Menu - Click here to open up the Organization Menu
- Home - Navigates to the first location plan in the organization
- Edit - Navigates to the Organization Settings page
- Add User - Navigates to the Organization Permissions page
4. Projects Column
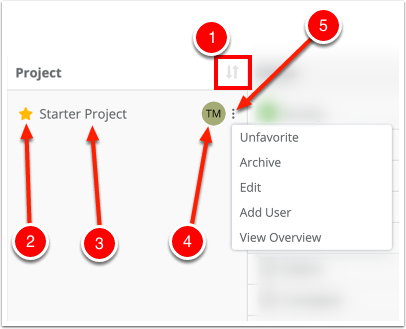
- Sort - You can sort ascending or descending by Project Name. Note that "Favorite" projects will still show up at the top of the Ascending List
- Favourite - Click on this star to mark this project as a favourite (or not). Gold star means favourite, and it will move to the top of the sorting order.
- Project Name - Click here to go to the first location plan in this project. Note that this will also filter out signs that are not part of this project.
- Users - Hover here to see which users are in this project. Click here to adjust permissions for this project.
- Project Menu - Click here to open up the Project Menu
- Favourite/Unfavourite - Either Favourite or Unfavourite this project
- Archive/Unarchive - Either archive or unarchive this project
- Edit - Navigates to the Project Settings page
- Add User - Navigates to the Project Permissions page
- View Overview - Navigates to the Project Overview page
5. States Column(s)
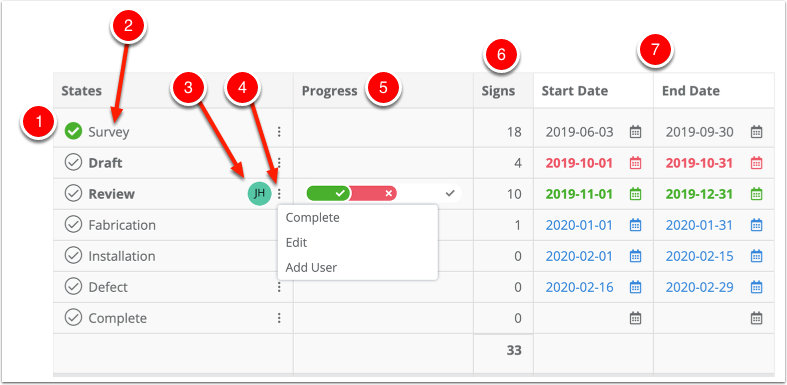
- Complete/Incomplete - Mark this sign as complete or incomplete. States that are marked as complete will no longer be considered "Active" or "Overdue"
- State Name - Click here to go to the first location plan in this state. Note that this will also filter out signs that are not part of this state.
- Users - Hover here to see which users are in this state. Click here to adjust permissions for this state.
- State Menu - Click here to open up the State Menu
- Complete - Mark this sign as complete or incomplete. States that are marked as complete will no longer be considered "Active" or "Overdue"
- Edit - Navigates to the State Settings page
- Add User - Navigates to the State Permissions page
- Progress - Shows the process of any states that are currently undergoing a review (or using other state specific actions)
- Signs - Shows how many signs are in this state
- Start/End Date - Allows you to see and adjust the start and end date for this state. Note that the different colours mean different things:
- Grey: Complete/Inactive - This state is completed, or doesn't have a start and end date
- Red: Overdue - This state is past its scheduled End Date
- Green: Active - This state is between its scheduled Start Date and End Date
- Blue: Future - This state is before its scheduled Start Date
Note you can also sort by the start dates and end dates by clicking on their headers!