You’ve been invited to this page because your sign designer needs you to review some signs. Before you begin, here’s a brief introduction to SignAgent, the platform your designer has used to create your sign program.
SignAgent is a single source of truth for sign assets, locations, art, and information. SignAgent provides an always-up-to-date database of signs with a clear audit trail. No need to sort through multiple revised documents, cross reference different message schedules, or follow confusing email strings. With all sign information centralized, you’ll get your review work done in half the time.
Reviewing signs in SignAgent is super easy. One-click approval, easy-to-follow revisions, and a record of changes keep your projects moving smoothly and on budget.
Watch this video to see how to get started in under five minutes!
Written Instructions
1. Sign up for SignAgent™

When you're invited as a reviewer to a project in SignAgent™, you'll receive a notification email asking you to create an account. If you click on the link in that message, you'll just need to create a password and you'll have access to view the project.
It's important to note that all reviewers in SignAgent™ are free! You don't have to pay for this access.
For now, you must sign in and use Google Chrome as your web browser in order to review signs using SignAgent. You can download that for free here: https://www.google.ca/chrome/
2. Add Account Information
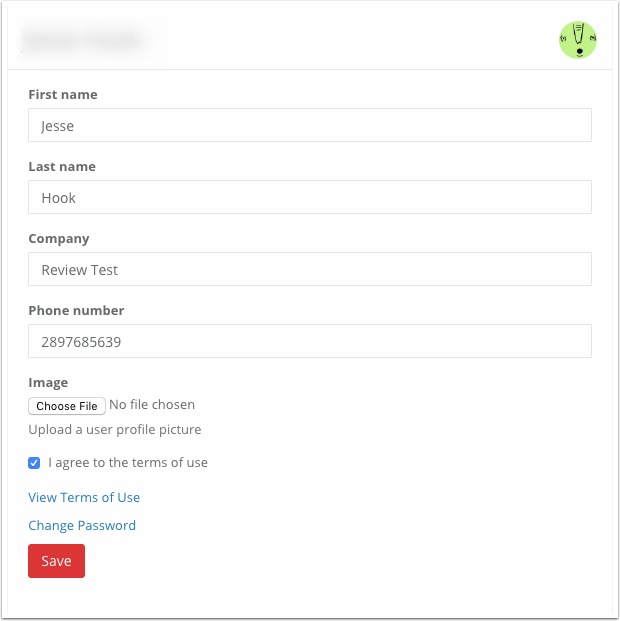
The next step is to add a bit of information about yourself. Your name will be used to let people know who is reviewing or leaving comments about signs, but won't be visible to anyone outside of the project.
You can choose to add a profile picture if you like, and make sure you agree to the terms of use before starting to use the system.
Once you have registered with SignAgent, you will be able to view any projects that your sign management professionals include you in as a viewer. Be sure to keep track of your username and password!
3. Go to the Dashboard, and select the Project to Review
Once you've done that, you can choose which project to review. Oftentimes, you'll only have one option, at least to start. To do this...
- Click on the Dashboard to navigate to your project list
- Choose your project you'd like to review by clicking on the option to Review for the appropriate project

Note that you can also see the review progress (if it's started already), how many signs are available, and the start date and end date for this review state.
4. Start Reviewing Signs

To review a sign's contents, all you have to do is select which sign you'd like to review by clicking on it (either on the floor plan, or in the list on the left). This will jump you to that sign's location, and bring up a dialog with all relevant information about this particular sign.
Once you've looked it over, you can decide to Approve or Reject this sign by using the Checkmark or X button at the top of the dialog. Note that if you "Reject" a sign, you'll need to include a comment.
When you've approved or rejected a sign, the dialog will automatically move you to the next sign in the sequence for you to review.
- As a free reviewer, you won't be able to change sign information directly. You'll have to leave that to whoever invited you to the project (or other users in the project).
- Please note any questions, changes, deletions or additions in the comments section of the documents below whether or not you have accepted or rejected the sign. Your sign programming specialist will be notified and will update the document accordingly.
5. Other Notes
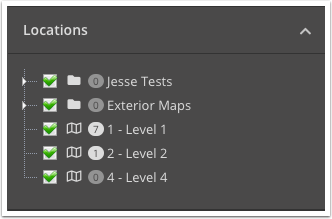
If you want to jump to a specific location plan, you can just select it from the left-hand sidebar, under Locations. You can also just select a sign from the list, and it will jump to that sign's location.
Note that sometimes location plans may be organized into folders. If that's the case, you can expand the folder by clicking on it.
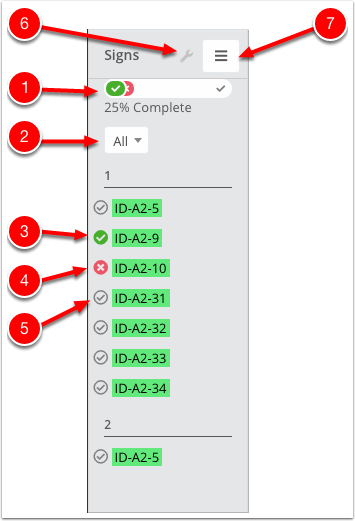
To see the progress you're making, just check out the list of signs on the left.
- The progress bar shows your progress through the review. If you hover over the bar, you can see more details.
- You can filter which signs you're viewing by using this dropdown. You can toggle between All, Not Yet Reviewed, Approved Only, and Rejected Only
- A Green Checkmark next to a sign means that it's been Approved
- A Red X next to a sign means that it's been Rejected
- A Grey Checkmark next to a sign means that it is Not Yet Reviewed
- You can change how these signs are sorted by clicking on the Wrench icon. You can also export data from here.
- You can view an expanded list view by selecting this button. (Example of this below)

- If you don't want to view all the signs on the plan at once, you can toggle visibility filters in the left side-bar. See more info on that here: Sign Visibility Filtering
- If you want to add a comment to the sign without or in addition to approving or rejecting it, just scroll down to the bottom of the sign dialog where you can leave comments
Want more information about invitations and collaboration?
Check out our webinar: Collaboration in SignAgent