Let's make this sign - where the header, text, and symbol can all have dynamic colors applied to them.

1a. Color in Shapes
In this example, we've added a rectangle to the header, which will be dynamically colored based on whatever we choose for that sign within SignAgent.

Note: this view is in outline mode in Illustrator to show all the elements of the sign clearly
To add this functionality, use the following naming convention for the shape layer's name:
fill_color: {COLOR FIELD NAME}, stroke_ color: {COLOR FIELD NAME}
In this example, the field name is called "Background Color", so the layer name for the rectangle we've drawn is:
fill_color: {background_color}
Note: We didn't need a dynamic stroke color for this sign, but you could add one if you wanted according to the naming conventions above.
1b. Colored Text

To have the text dynamically match the color of a color field, just add "color:{COLOR FIELD NAME}" to the text's bounding box layer.
So, in this example, the bounding box for the "room_name" text is:
left, top, color:{content_color}
The text within the curly brackets should match exactly the name of your color field, with underscores in place of spaces if needed.
2. Dynamic Colors in Symbols
To learn how to make the symbol (or visual) have dynamic color, please refer to this article. For this particular example, we've programmed the symbol to also follow the "Content Color" field's color selection.
3. Creating the Sign Type

Create your sign type as normal, just be sure that your "color" field is of the field type "Color (hexcode)" or "Color (choice)"
For more info on how to do that, check out this article: Manage Fields
You can easily check this field by clicking on the link icon to the right of the field name
4. Create your Sign

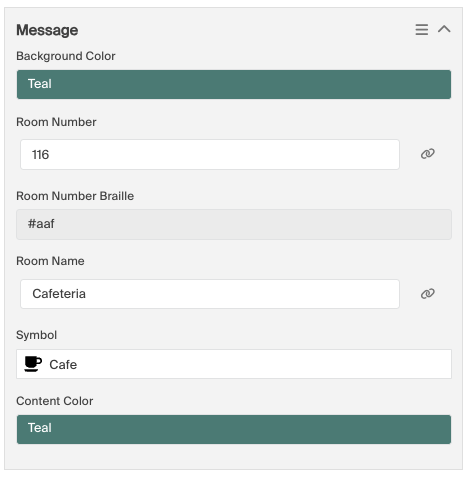
Now, whenever you fill out that "Background Color" field, the colored rectangle from your template will change colours accordingly, and whenever you fill out the "Content Color" field, the text (and in this case, also the symbol) color changes accordingly.