
The Sign Designer is the easiest way to automate your artwork. This article is for those who already know about templates.
If you're new to automating artwork, check out this article instead.
Webinar
Access
1. Create a new sign type. It's not necessary to add the necessary fields to the sign type at this point, but adding them now won't interfere with later steps.
2. Right click on the sign type from the left-hand sidebar and select "Sign Edit" 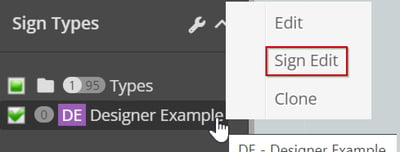
Upload
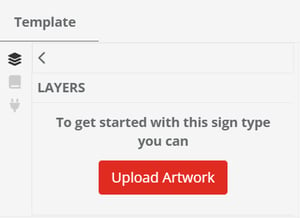
You're now in the Sign Designer. The first step is to upload your artwork to the designer. There is a big red button on the left-hand side to do this. The file type will need to be an SVG. To learn more about the necessary SVG export settings, check out this article.
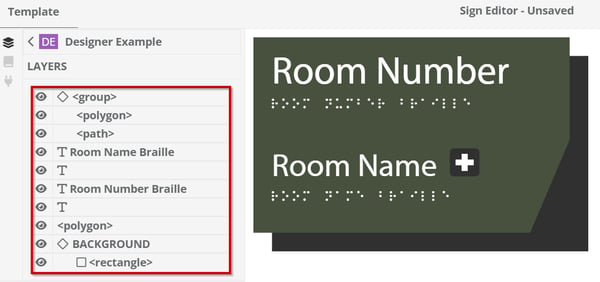
The artwork will appear and there will be a breakdown of the layers from the original file in the left column.
Assigning Text Fields
1. Select Object - For this example we'll select Room Name. It can be selected either by clicking on it from the left column or in the artwork.
2. Connect a Field - In the right column, there is a + icon next to the Field header. Clicking this button will start the process of connecting this element in the artwork to a field in the sign. 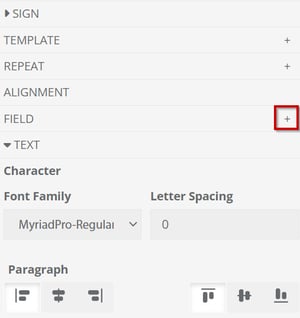
2b. Select Field - The fields available in the "Name" dropdown will be all of the message fields set up within the organisation. Whatever is entered as "Placeholder Text" is what will display in the artwork preview.
🔥🔥🔥🔥🔥🔥🔥🔥🔥🔥🔥🔥🔥🔥🔥🔥🔥🔥🔥🔥🔥🔥🔥🔥🔥🔥🔥🔥
To add a brand new field from within the Sign Designer see this article.
🔥🔥🔥🔥🔥🔥🔥🔥🔥🔥🔥🔥🔥🔥🔥🔥🔥🔥🔥🔥🔥🔥🔥🔥🔥🔥🔥🔥

2c. Field Settings
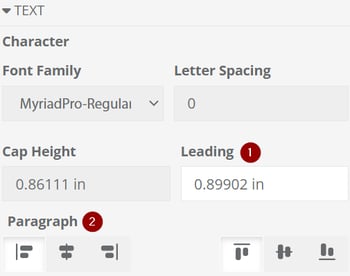
1. Text Settings - The font, spacing, and cap height will be determined by the characteristics of text in the uploaded file. Only the leading can be adjusted from within the Sign Designer.
2. Justification - Horizontal and vertical justification can be set using the option icons.
3. Maximum Size - The width and line options control the maximum space that the text will be allowed to occupy. If the text for said "Room Name Example", it would be too large to fit in the single blue line and in this example would drop onto the second line. If instead the text said "Room Name Examples Are Really Long" the text would overflow the maximum area allocated to it and be cut off after the second line.

4. Advanced Options - The Sign Designer is a work in progress and not all features that were available in Illustrator based templating have been incorporated yet. The advanced text box allows a user to add any bounding box commands to the field that the Sign Designer is not yet capable of handling. 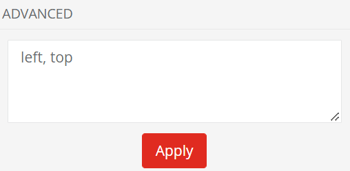
Assigning Visual Fields
The process for creating non-text fields is very similar. There are two differences in the settings.
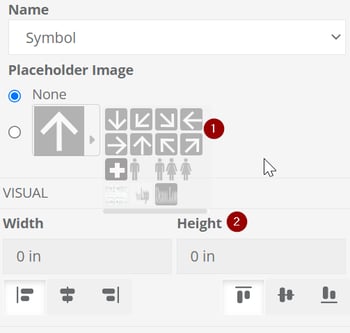
1. Placeholder - The placeholder images available for your artwork will be the visuals that have been uploaded to your organisations. Learn how to upload visuals here.
2. Height - Height works the same as width to control the maximum boundary of the image.
Repeat until finished
You're now capable of creating basic templates. There are lots of additional capabilities that you can read about in the articles below.
Alignment
Repeats
Options