Good for those 2-faced so-and-so signs.
If you want to create a 2 sided sign but not include templated artwork, skip to section 3.2 in this article.
1. Create the Sign
Draw the sign the way you always do (in Illustrator), with each side drawn separately, but on the same artboard.
Then follow the instructions below to create the dynamic 2-sided sign template using SignAgent.
You only need to draw the first line of the multi-line on side 1, and the first line of the multi-line on side 2.

- Move everything to one layer and call it "Sign" or "Preview"
- Create a nested layer in "Sign" or "Preview" called "side_1"
- Draw a no fill / no stroke rectangle to define the side. This bounding box does not need any justification commands. It should encompass all of the content that goes into "side_1".
- Create a nested layer in "side_1" called "column"
- Draw a no fill / no stroke rectangle to define the column. This is the space in which the repeats can be drawn.
- Create a nested layer in "column" called "repeat"
whatever elements are in the folder will be repeated. - Create a nested layer in "repeat" called "height"
Draw a no fill / no stroke rectangle that encompasses all repeating elements. The height of the rectangle is used to step and repeat the rows. For more complex spacing, see this article. - Create a nested layer for each field in "repeat" that you want to be dynamic. These elements are created just like standard text and visual fields.
- Create a nested layer in "Sign" or "Preview" called "side_2", and repeat steps 3-6
- For side_2, you can also just duplicate what you've done already, but note that it doesn't have to be identical. You can have different sizes, alignments, fields, etc. if needed.
side, column, repeat and height element must be called out using exact names.
- You can also use side_3 and side_4 if you need more sides
- column is used to specify the location and extent where the repeating element can repeat. If there is more than one element use column_1, column_2 etc.
- repeat is used to specify the elements that should be set and repeated.
- height is used to specify the height of the repeating element and is not required. If you don't specify the height SignAgent will calculate the repeat based on the all the elements in the repeat layer.
- Layer Names should all be lowercase.
- Spaces should be replaced with "_"
- Layer Names must match Field Names
Field Name "Room Number" = Layer Name "room_number"
2. Exporting Template
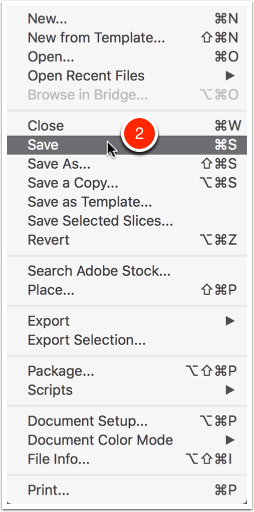
2.1. Save Template
- Select File (not shown)
- Select Save
Make sure that you save it in a place where you can remember.
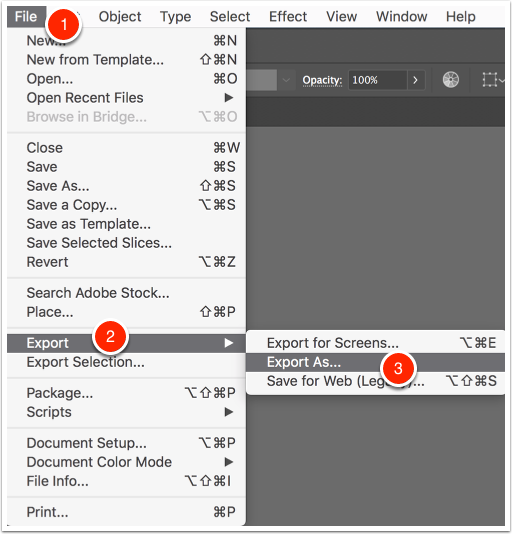
2.2. Export as SVG
- Select File
- Select Export
- Select Export As…
Make sure that you save it in a place where you can remember.
Make sure that you export to place where you can remember.
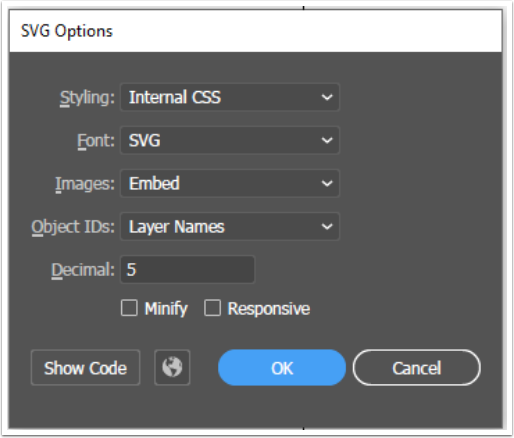
2.3. SVG Options
Make sure your export options match the following
3. Upload SVG
3.1. Edit Sign Type
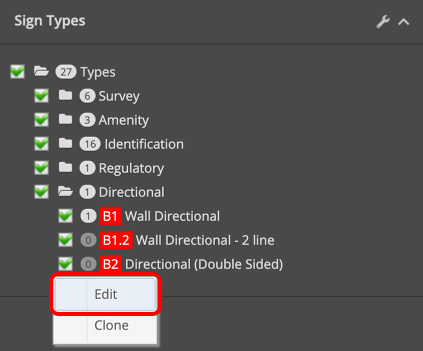
- Right click on the sign type that you want to edit
- Select Edit
3.2. Match Fields
For more information on repeating fields see this article.
Make sure your export options match the following
The "Message Fields" section can be left blank if you aren't using any non-repeating fields
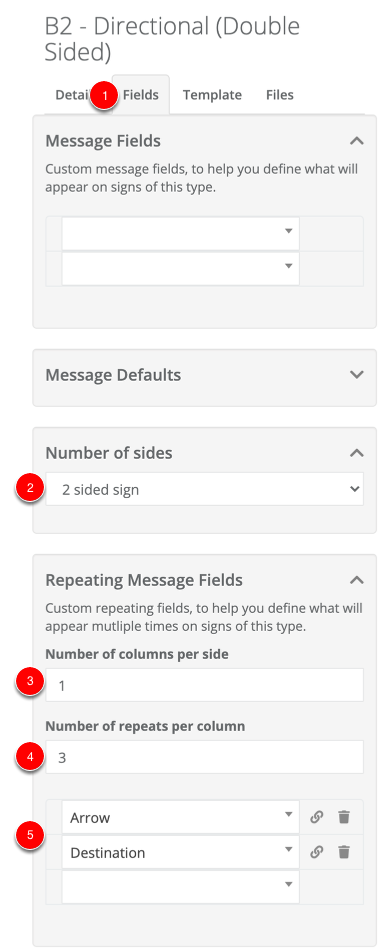
- Select Fields tab
- Select Number of Sides
- Enter Number of Columns
- Enter number of repeats/rows per column
- Add Repeating Message Fields
- Save (not shown)
- The Save button is at the bottom, or you can press cmd+s (on Mac) or ctrl+s (on PC)
3.3. Choose SVG Template
Fonts must be installed prior to uploading the SVG and must match the name exactly as specified in the SVG.
See Adding Fonts Tutorial.
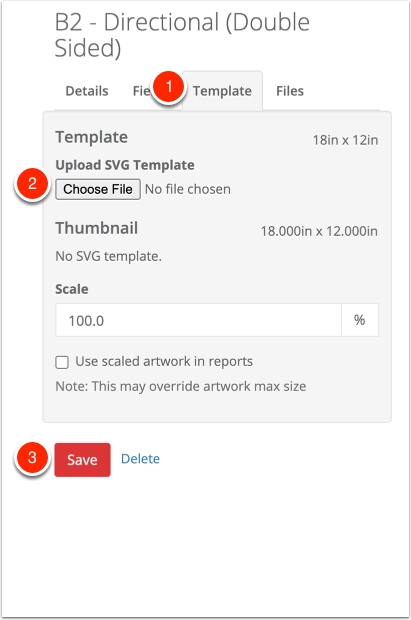
- Select Template Tab
- Press Choose File button, and choose the SVG you exported in step 2 (Exporting Template)
- Save
Complete!
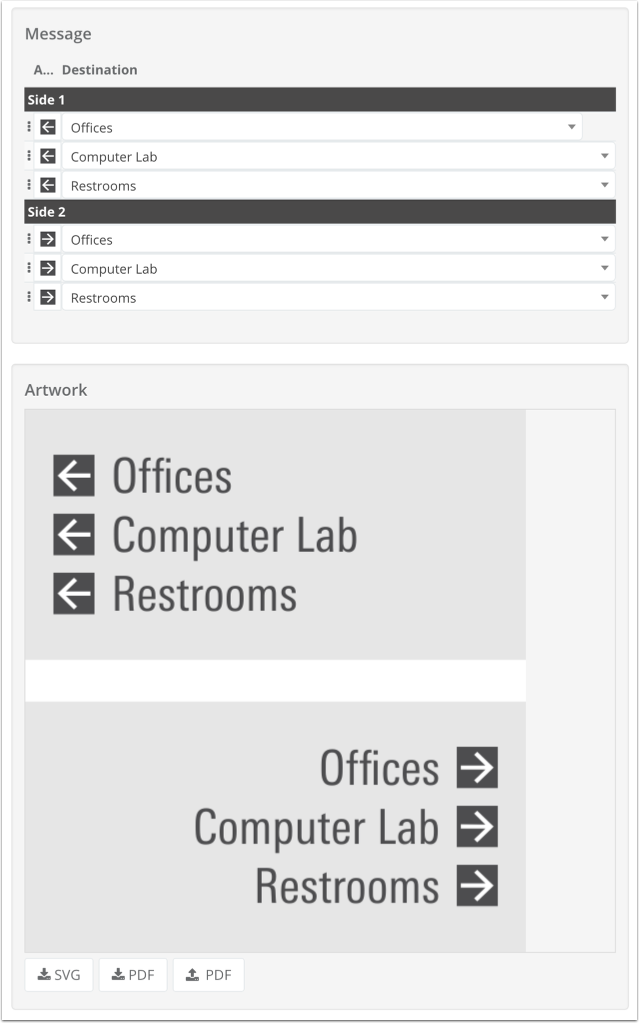
You should now be able to select one of your signs, enter messaging, and have it auto-generate the artwork!
You'll notice that both sides are contained on the same artboard. When producing the sign you can use the Adobe Tiling feature to split the document into multiple pages.