The most fun you'll ever have editing reports!
To see a list of shortcuts that can be used in reports, please see this article.
1. Text Editor

Lots of options in here again; most of which should be pretty familiar. However, there are a couple of advanced items to highlight.
1.1. Source

Clicking on Source will allow you to modify the CSS code for this report segment directly. You probably don't want to touch this unless you know what you're doing.
You can also use this segment to easily copy this report segment from one report to another. So, if you want to copy this part of your report into another document, just select all the CSS coding, copy it, and paste it into your other document. It will match the formatting exactly. Anyone can do this!
1.2. HTML Layout Options
These options will allow you to modify the structure of the report using Quote Blocks and Div Containers, where as the "Show Blocks" button will show you the base structural elements being used in this report segment.
Again, you can probably ignore these buttons unless you know what you're doing.
1.3. Add an Image
This allows you to choose an image to include in this report, which is great for logos or other symbols. This pulls from the Manage Visuals page in this organization.
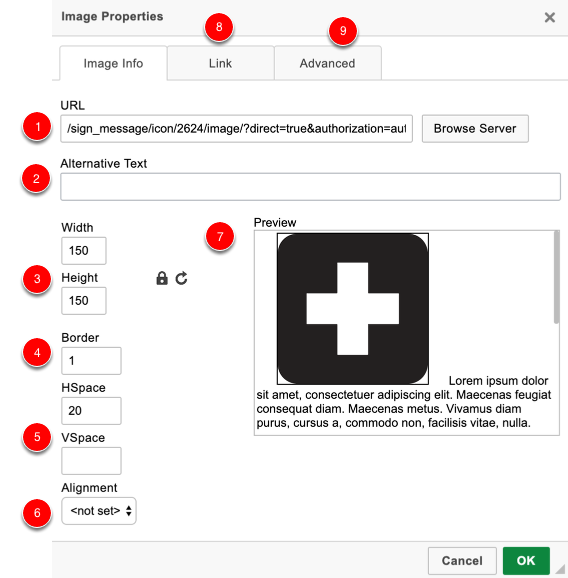
After clicking on the Image button, this dialog will pop up. Here are your options in this window:
- URL/Browse Server - This is used to choose your image. Clicking the Browse Server option will allow you to choose an image from your Manage Visuals page
- Alternative Text - What shows up on hovering over this image
- Width/Height - The width and height of this image, in pixels. Adjust these values based on how things look on your screen.
- Border - Allows you to apply a black border around the image. The value here is the border weight, in pixels
- HSpace/VSpace - The horizontal and vertical spacing, respectively, around the image.
- Alignment - You can choose between left and right.
- Preview - A preview of what your image can look like amongst some sample text.
- Link - Allows you to add a link when people click on the image
- Advanced - Don't worry about this unless you're a CSS/HTML expert.
Want some more fonts? This editor can also choose from any fonts that you've added in your Manage Fonts section!
2. Editing Report Content
For the most part, you can just start adding information into your reports as needed, using the appropriate replacement commands for the segment you're in. However, there are a couple of things you should note:
2.1. Adding Rows or Columns

Adding rows and columns works similarly to working in a table in a word processor or spreadsheet program.
Row height will be based on the height needed for the content up until the height specified in the document setup.
Column width can be adjusted by clicking-and-dragging on the column border. Note also that what appears on your screen here will be expanded out to match the width allowed in your document setup. If your content is too wide to fit in your columns as designed, they may be automatically adjusted upon export.
Note that your Header and Footer should only have 1 row of information. Your Body can have up to 4 rows of information.
See these tutorials for more details:
Headers and Footers Report Body
2.2. Cell Properties
To get even more precise in your design, you can modify the properties of each cell (or row or column) by right-clicking on it and choosing Cell Properties.
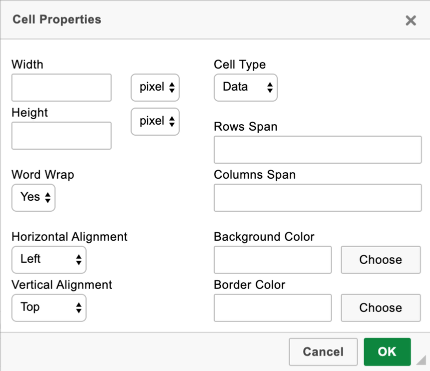
Here, you can add some more details, like width/height, word wrapping, text alignment, background colour, border colour, and more.